Docker Compose is a tool for defining and running multi-container Docker applications by using a YAML file to configure your application’s services. As a big Proof-of-Concept warrior in the corporate setting and hobby researcher by night, Docker Compose has simplified the way that I build and deploy containers, structure virtual networks and test applications or programing projects.
This post will walk the reader through the development and deployment of a Docker Compose YAML file, complete with screen shots of the process and diagrams to help better visualize construction and architecture. As always, I’ll be using Pop!_OS for the this walk-through, but you can following along easily with any Debian or Ubuntu-based distribution.
If you do not know anything about Docker, Docker Compose or YAML files, don’t worry: This post will have all of the commands you need to be successful with your deployment. That said, it’s probably worth checking out the following video before jumping to the next section.
Scope
This post assumes the reader is new to Docker, Docker Compose and YAML file development, and seeks to equip the foundational skills and knowledge required to successfully read, write and modify the same.
In this post, we’ll work through the following:
- Build three containers, including Ubuntu, a nginx web server and its associated MySQL database.
- Configure two isolated networks: one for the Ubuntu container, and one for the web server and MySQL database.
- Link the nginx web server and its associated MySQL database within their isolated network
- Deploy and troubleshoot
Setting up your Environment
There is a difference between Docker-Desktop (Official), docker.ce and docker.io. In fact, this thread on stackoverflow explains the differences quickly and had 112k views on this topic at the time of this writing. Since I’m using a Debian or Ubuntu-based desktop as my workstation, we’ll be installing docker.io and Docker Compose with the following command:
sudo apt install docker.io docker-compose -yWith this complete, we’ll next need to make a directory to store (and launch) your compose file from. I will be using Documents/Docker-Compose with this demonstration, but you may want to use something different or change this later as you create more YAML files. To do this, you’ll execute the following lines in your terminal:
cd Documents
mkdir Docker-Compose
cd Docker-Compose
With this, we’re ready to start building our YAML file.
Starting Off & YAML Syntax
Rather than load you down with a text book style introduction, list a slew of commands or tell you to just read the documentation (get used to this), I’ll explain the concepts as we go along in OJT-style. Also, we’re going to be using nano in this demonstration, because it’s included with all Linux distros, and because this demonstration has so few lines that it will be more difficult to get lost than follow along. However, for more complex YAML files in the future, I will be using VSCodium.
Unlike YAML file development for Ansible, our Docker Compose file will not start off with a list (hash or dictionary), but we will still be building with the key:value pair concept.
Adding the Ubuntu Container
So lets get started by building the file. You can call it what ever you want but mine will be titled docker-test.yaml.
nano docker-test.yamlDisclaimer: Docker compose looks for a file named “docker-compose.yaml” by default. Launching a custom file name is a slightly longer syntax in the CLI, but since this posts aims to build solid habits, we’re going to pursue the custom route. This will pay off in the future as you deploy multiple files or are working with multiple YAML files within the same directory.

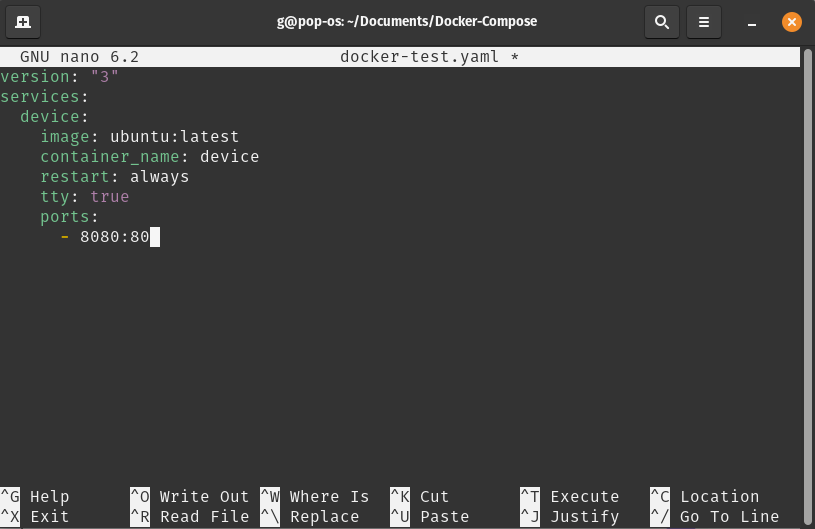
The above nano command has a launched the nano editor and created a file within your Docker-Compose directory. In the image below, you’ll see an indent, which is generated with the tab key. Like Python, YAML files are pretty strict with this.
- Version: We enter the current version number of Docker Compose. At the time of this writing, the current version is the number is 3.9, but I have never run into issues by entering a simple “3”.
- Services: Here, we are telling Docker to look for the container titles on the next indent line, as well as their definitions or attributes indented on the lines past those.
- Container Title (single tab): In our example, we use ‘device’ as the container title, but you can use anything you like, as long as it’s unique from other containers.
- Image (2x tabs): For this first example, we’ll be using the latest version of hte official Ubuntu image available on Docker Hub.
- Container_name: This is included so that we can reference the container by name, instead of having to copy/paste a container ID from the terminal, when the file is active.
- Restart (Optional): This option tells the container to reboot everything you launch the YAML file, which is not done by default.
- Tty: This option enables pseudo-teletype for the container, which offers basic input-output through the terminal. Without this option but with restart enabled, your Ubuntu container will be in stuck in perpetual restart mode unless you give it other commands and scripts to run.
- Ports: Here we specify the port mapping by using 8080:80, which tells Docker to expose internal port 80 of this container through port 8080 of our host machine.
As discussed in the scope, we’re planning to add a few more containers and specify networks, but this is a good stopping point because if you hit Ctrl + S to save, then Ctrl + X to exit the nano editor, you can run this file, as It already contains everything that Docker Compose needs.
You can skip to the ‘Finished Product & Deployment’ section of this post to see some quick commands on deployment and troubleshooting if you like. However, and before we move to the next section, lets go ahead and delete the values after ports. We’ll go through this in the “Networking” section in more depth, but with the above configuration, our Ubuntu container will deploy while attached to the default (bridge) network.
Adding the Web Server & MySQL Database
Building and deploying an nginx web server with Docker Compose is probably the most common tutorial out there. However, ours is going to be a little more complex, as we will be linking a MySQL database to the server, enabling persistent storage on the database with the use of a storage volume, then isolating both the server and database in their own user-defined bridge network.

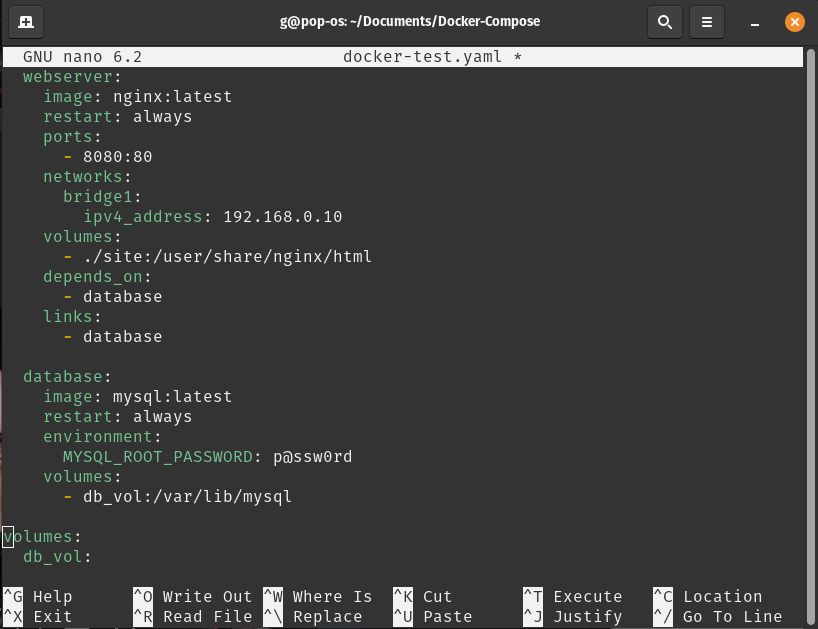
In the above image, you’ll see that we follow a very similar pattern with both containers (webserver & database) as we did with the previous Ubuntu container, but with a few added features:
- Networks: We declare a network and specify ‘bridge1’, which is the user-defined bridge network we will create in the next section.
- Volumes: For the web server “./site” tells docker to use the files within a directory titled “site” which I’ve placed within the same directory as our test files. On the same line, the information after the colon reads “/usr/share/nginx/html” and mounts the directory to the location where nginx will look up the website.
- Depends On: This starts a condition where the container with a dependency will only start if the container it’s dependent on can be started successfully. In our example, this means that the webserver container will only start if the database can start first.
- Links: Since these both the webserver and database containers are within the user-defined bridge network, they are able to communicate by IP address. By adding database (by name) to this YAML file, docker compose automatically adds a DNS entry to /etc/host file on the webserver container, made possible by the user-defined bridge network driver we’ll cover in a bit.
- Environment: We’ll be declaring environment values a lot in the coming posts, but for this one, MySQL’s official image page lists an example where “MYSQL_ROOT_PASSWORD” is required to access the database. I’ve changed the password from ‘example’ to “P@ssw0rd” for this demonstration. In later posts, we will cover best practices for storing passwords.
- Persistence: Each time you shut down docker, it will wipe the memory stored within the MySQL database by default, unless the database is attached to a storage volume. We declare ‘volumes’ on the same indent line as “services”, then name the volume. Going back up to volumes within our database, we enter the name of the volume ‘db_vol’ then specify that we want to mount it in /var/lib/mysql where MySQL will look it up.
Networking
Entire posts can be (and are) written on this topic, so I may have to return to Docker networking in future posts, or just reference some of the great work being done by the community. However, in attempt to streamline these concepts for the purposes of this post, lets stick to some of the basic details of the types of networks (or “network drivers”) that we’ll be deploying with this project.
Now, my personal preference is to build the network architecture prior to the containers, links and volumes, but I thought there was educational value in explaining the syntax and getting your first YAML file up and running on the default bridge network.
Bridge:
The bridge network driver is the default, and creates a private network internal to the host which allows all containers within this network to communicate. If you wish to grant external access to the containers on a bridge network, you must expose a port on the container, as we did above with by defining a value of :80 within the – port key.
This network driver is local in scope, meaning that it only provides service discovery, IPAM and connectivity to other containers within the bridge network. We’ll return to this limitation in a future post, but for now, take note that this will cause issues if deploying across a Universal Control Plane (UCP) or Swarm cluster outside of your host machine. As with the user-defined bridge, links between containers within the bridge network must be declared
User-Defined Bridge:
This is my personal preference when working with local environments, as it shares many of the qualities of the default bridge network driver in terms of simplicity and security, but with the added benefit that it allows for domain name resolution (DNS) which enables us to refer to other containers by name.This comes in handy as your YAML file goes through numerous modifications and the IP addresses change.
For the user defined bridge, it is optional to specify the subnet, the IP address range, the gateway, and other options for the driver itself as well as the containers which you hope to attach.
macVLAN:
As you’ll read in the documentation, this network driver type works great for legacy application or others which monitor traffic monitor traffic. The macVLAN driver assigns a MAC address to the specified container’s network interface, allowing it to interface directly to the host’s physical network. This isn’t required for our Ubuntu image, but I thought that it would be useful to examine the macVLAN’s configuration differences from the user-defined bridge.
Building the Networks:
We’ll start with the macvlan first, because we’re planning to connect our Ubuntu container to it, and the user-defined bridge second, which we will use to connect our web server and MySQL database.

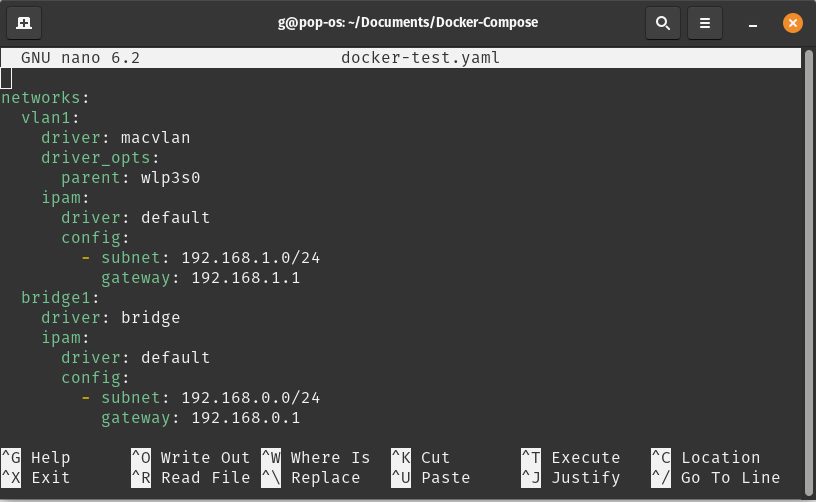
Working from the top, you’ll see that we declare ‘networks’ on the same indent-line and in the same manner as services. One indent (or tab) in, you’ll see that we’ve named both of our networks (vlan1 & bridge1), then we start defining drivers, ipam and configs.
Starting with the macVLAN network (‘vlan1’) you’ll see that we’ve defined the macVLAN driver as well as driver options (‘driver_opts’) with wpl3s0 as the value after the ‘parent’ key. If you were plugged into an Ethernet port, this would read ‘eth0’ or something similar,which can be found by typing “ifconfig” in a terminal. At this moment, I happen to be using my wifi card for my network interface, so I’ve used that as the parent.
Aside from that, you’ll notice that the keys & values under the IPAM sections are very similar, with both utilizing subnet and gateway ranges under the config key.
Attaching a Container to a Network
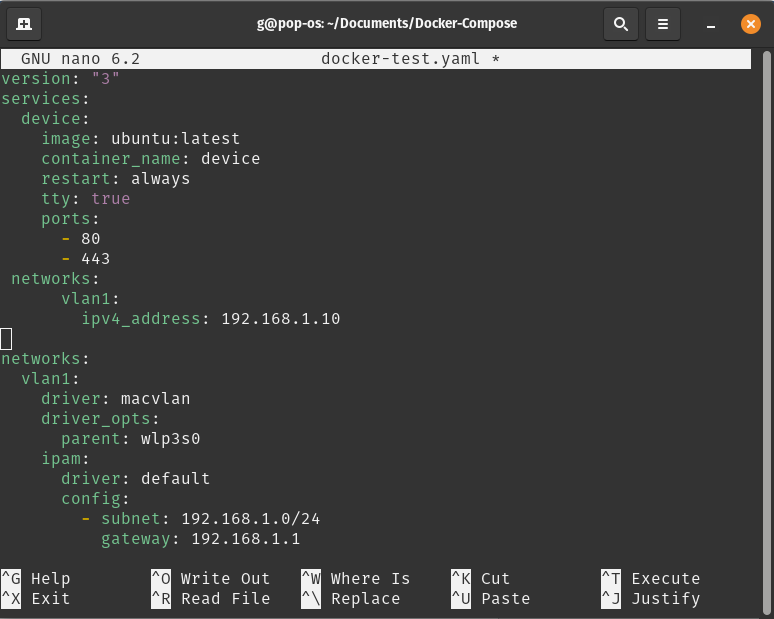
Now that we have defined two different networks, lets scroll back up to the ‘services’ section where our Ubuntu container is listed. Since we’re planning to remove this container from the default bridge and connect it to the macVLAN as a container on our host’s physical network, we’ll change the open to ports to 443 & 80. We’ll also add a line under ‘restart’ titled ‘networks’ and list vlan1 as well as our desired ipv4 address within the subnet range specified.

In the above image, I’ve modified to the YAML file as to stack the network next directly below the Ubuntu container for easy reference.
From the “Adding the Web Server & MySQL Database” section, we’re specified the information needed prior to building a network, so as long as we’ve entered everything correctly, both the web sever and database should be connected to the bridge1 network.
Finished Product & Deployment
All that’s left now is to deploy the your docker compose file. If you’ve chosen to title your file “docker-compose.yaml” with the system default, then you can skip the “-f docker-test.yaml” portion of this command.
sudo docker-compose –f docker-test.yaml up -dTo view the information about your environment:
sudo docker psEnter a shell on your Ubuntu device:
sudo docker exec –it device shWith the sudo docker ps command you (hopefully) saw that your web server is functioning, but you can check the content from your target directory by entering the following in your browser:
http://localhost:8080To shut down the environment, simple type the following:
sudo docker-compose –f docker-test.yaml downClosing Thoughts
At this point you should feel pretty comfortable with Docker Compose and playing around with your own YAML files. At the time of this writing, I am working to build a series of template files for my github repository, which I hope can serve as further inspiration on the topic.
As always, please feel free to reach out if you see errors or something is unclear, as I would be happy to make the necessary changes and discuss the topics further.
Upcoming Posts on this Topic:
- Create & deploy custom docker images
- Running Kubernetes in your Homelab cluster
Consolidated Resources:
- Docker Compose Installation https://docs.docker.com/compose/install/
- Using Compose: https://docs.docker.com/get-started/08_using_compose/
- Difference between docker.ce & docker.io https://stackoverflow.com/questions/45023363/what-is-docker-io-in-relation-to-docker-ce-and-docker-ee-now-called-mirantis-k
- Why you need TTY mode: https://stackoverflow.com/questions/66638731/why-do-i-need-tty-true-in-docker-compose-yml-and-other-images-do-not
- Docker Networking: https://docs.docker.com/network/
